How to Create a Table of Contents, Index, Hyperlinks & More?
For professional reports and academic papers, navigating the document efficiently is key. Modern Microsoft Word has powerful, automated tools to help you create a Table of Contents, an Index, and other references that make your work easy to read and navigate.
Creating a Table of Contents (TOC)
A Table of Contents is an automated list of the headings in your document and the page numbers they appear on. It updates automatically as you edit your document.
How to Create a TOC
The magic behind an automatic TOC is using Styles.
Apply Heading Styles: Go through your document and apply heading styles to your titles and subtitles. Select your main heading and on the Home tab, click Heading 1. For subheadings, use Heading 2, and so on.
Insert the TOC: Place your cursor at the beginning of your document where you want the TOC to appear.
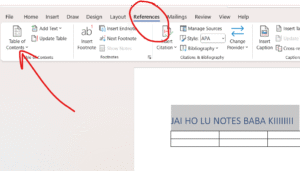
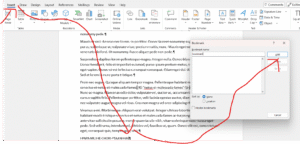
Go to the References tab and click Table of Contents.

Choose one of the Automatic styles from the drop-down menu. Word will instantly generate the TOC for you.
How to Update a TOC
If you add, remove, or change headings or pages, you must update the TOC.
Click anywhere on your Table of Contents.
Click the Update Table option that appears at the top.
Choose to Update page numbers only or Update entire table.
Creating an Index
An Index is an alphabetical list of keywords and topics found in your document, along with the page numbers where they appear. It is usually placed at the very end of a document. (it is very useful while putting authors reference in the book or research paper)
How to Create an Index
Creating an index is a two-step process: marking the entries and then inserting the index.
Mark Entries: Go through your document and find a key term you want to include in the index.
Select the term.
Go to the References tab and click Mark Entry.
In the dialog box, click Mark (to mark just this instance) or Mark All (to mark every instance of this term in the document)
Repeat this for all the keywords you want in your index.
Insert the Index: Place your cursor at the end of your document.
Go to the References tab and click Insert Index.
Choose a format and click OK. Word will compile all your marked entries into a neat, alphabetized list.
Using Bookmarks and Cross-references
A Bookmark is an invisible marker you place on a specific word or location in your document so you can quickly jump back to it later.
To create a bookmark: Place your cursor at the desired spot, go to the Insert tab, and click Bookmark. Give the bookmark a one-word name and click Add.
To go to a bookmark: Click Insert > Bookmark, select the bookmark name, and click Go To.
Cross-references
A Cross-reference allows you to link to other parts of your document. For example, you can write “See Figure 2 on page 5,” where “Figure 2” and “page 5” are dynamic fields that update automatically if the figure or page number changes.
Place your cursor where you want to add the reference.
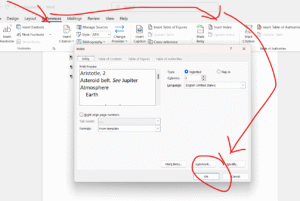
Go to the References tab and click Cross-reference.
In the dialog box, choose what you want to link to (e.g., a Heading, Bookmark, Figure) and click Insert.
Creating Hyperlinks
A Hyperlink is a clickable link that can direct the reader to a webpage, a file, or another location in the same document.
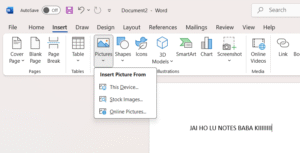
Select the text or image you want to make a link.
Go to the Insert tab and click Link.
In the dialog box, you can:
Link to an Existing File or Web Page by typing the URL in the address box.
Link to a Place in This Document by choosing a heading or bookmark.
Click OK. The selected text will now be a clickable link.
Using Footnotes and Endnotes
Footnotes and Endnotes are used to add extra information, comments, or citations to a document without cluttering the main text.
A Footnote appears at the bottom of the page where the reference is made.
An Endnote appears in a list at the very end of the document or section.
How to Insert a Footnote or Endnote
Place your cursor in the text where you want the reference number to appear.
Go to the References tab.
Click Insert Footnote or Insert Endnote.
Word will automatically insert the reference number in the text and move your cursor to the corresponding note area (either at the bottom of the page or the end of the document) for you to type your note.